- Colection of 65 PHP scripts for $4.29 each
Knowledge Base
Here you can find answers to commonly asked questions about our Appointment Scheduler script.
Appointment Scheduler
The knowledgebase below is for the previous version for Appointment Scheduler script. We've recently launched a new version based on our latest framework and are currently working on a new knowledge base for it. Read more in our blog here.
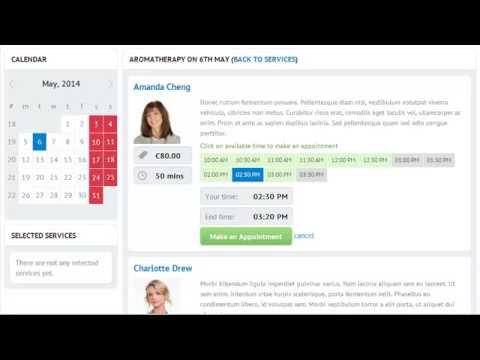
Once the script is installed. Go to the script folder using your browser and log in to the Admin. Add staff, by going to the Employees page, then add Services from the Service page. Don't forget to assign them to one or more employees and set service length.
You can manage script settings under the Options page.
Then you can embed the script on your web page. Go to the Install page and follow the instruction.
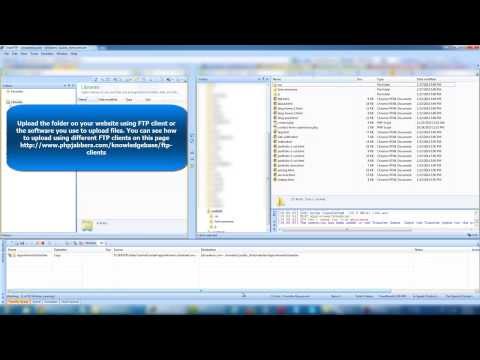
You can have the Appointment Scheduler up and running in just a few minutes. Once you purchase and download it you need to upload the on your server. An install wizard will guide you through the installation process. Watch the video to see how to install the script.
You can watch videos showing how to install on Wordpress and Joomla based websites here.
You can add and manage employees under the Employees page. Watch the video to see how to manage staff and what access your employees have to the system.

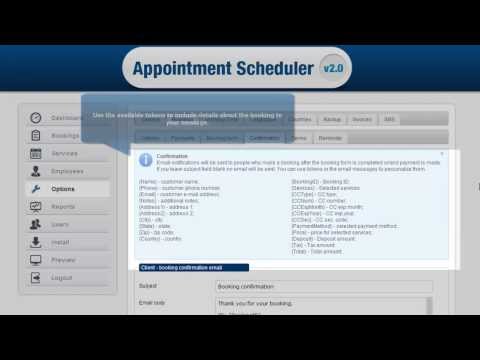
With the STIVA Appointment Scheduler you can set an email autoresponder to both clients and admins. Watch the video to see how to set and personilize email notifications with STIVA Appointment Scheduler.
Use the built-in Language module to edit all system messages and the front-end language. Watch the video to see how to edit the default titles and easily translate the Appointment Scheduler into any language.
Use the Working Time tab under the Options page to set working hours. You can add a custom working hours, set vacations and holidays.
Usually the Appointment Scheduler comes with all that options set by default. You can manage bookings and payments under the Options page.
Click on the Options tab to manage the general bookings settings, including the option for accepting or not accepting bookings.
Click on the Payments tab to manage whether you accept payments online or not, and manage payment methods.
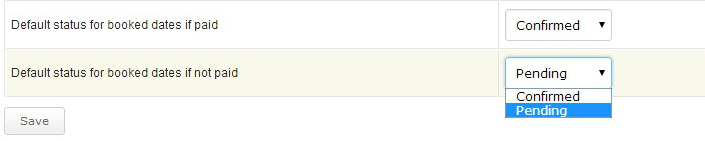
Please note that all pending bookings are always available on the front-end. By default the script sets bookings as pending if not paid. As soon as payment is made, the reservation is confirmed. All confirmed reservations are unavailable for second booking.
If you'd like a booked time slot to be unavailable instantly after booking, please change the settings for the default booking status under the Options>Bookings>General.
If you'd like bookings to be set as unavailable instantly and in no regard to payments, please set the option "Default status for booked dates if not paid" to Confirmed.
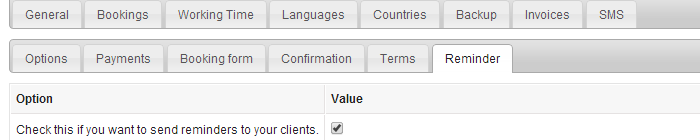
To send SMS text reminders to clients you need to check the option in Options/Bookings/Reminders. Then you can add your own text message for both the email reminder and the SMS.
In order to send SMS notifications via the Appointment Scheduler 2.1 you need to use our SMS gateway and order an API key. You can find more about the SMS service here...
The Appointment Scheduler script uses our own SMS service and currently you cannot configure the SMS sending using another company API. If you already have an account in any other SMS company we can implement it as a custom change. Contact us to request implementation...
Please note that when you add a service in the back-end you need to add its length in minutes and also assign the service to either one of your employees.
You can add services under the Services page.
The email address the confirmation/reminder emails are sent from is the address set in the administrator's profile under the Users page. Changing the administrator's email address will also change the default email sender address.
You can change both the default timezone and date/time format from the admin, under the Options page.
You can find the backup function under the Options>Backup. Use the checkboxes to select whether you want to create a backup for your database, files or both and click the Backup button. Then you'll see the backup in zip files that can be exported with a click.
You can do that under the Options>Invoices. You can add your company details, upload your logo and create your own invoice template and invoice configuration under the Invoices page.
Once you have already created invoices, go to Bookings, then click on the Invoices tab. You should see all the invoices you have created. Click on the pencil button at the row of the one you'd like to see (do not click on the order ID). From then you can edit, print, preview and email invoices.
All the currencies supported by the Appointment Scheduler are listed in the drop-down menu in the General Options tab (Admin > Options > General). Use the drop down menu to set currency, then click Save.
If the currency you need is not supported, contact us and we will add it.
Appointment Scheduler supports the following payment options:
1) PayPal
2) Authorize.net
3) Bank account (for wire transfers)
4) Credit Card (for offline processing)
5) We can add more payment options to your booking calendar.
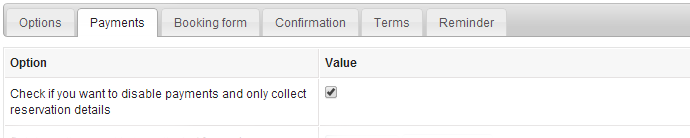
Yes, you can disable payments and still accept bookings. You can do that by following these steps:
1. From the Admin, go to Options.
2. Click to open the Bookings tab.
3. Then go to Payments and make sure that the first option "Check if you want to disable payments and only collect reservation details" is checked.
4. Click the Save button at the bottom of the page.
N.B. Make sure that the "Accept bookings" option is checked too. Otherwise making an appointment from the front-end will not be allowed. You"ll find that option under the Options>Bookings>Options.
You can set a deposit payment to be required in order the appointment to be confirmed. This can be set from the Options>Payments. You set your deposit as a percentage of the total amount or as a fixed amount per appointment.

You can translate the script by using the Languages page (Options>Languages).
You can do the translation manually by adding your own translation to the title and then click Save, or import an SQL translation file under the Import/Export tab. You can check this page to watch a tutorial on how to translate and change titles.
Note that by default the Appointment Scheduler 2.1 comes in English. You can translate the booking calendar using the Language module and manually update all titles and system messages, otherwise you can import a new language file to replace the current translation of the script.
To do that, follow these steps:
1. Go to the Options > Languages and then under the Import/Export tab export the current language file.
2. Open the file using any text editor and replace the second-last column with your own titles.
3. Make sure that you save the file with a file extension .sql
4. Import the new language file using the Import/Export tab.
This is important when you need to re-install the script, because the new installations always come in the default English version. Please make sure you export the translation before uninstalling the script.
You can add your own booking terms by going to Options>Bookings>Terms. Use an external URL or insert the booking terms directly. The your clients can read the booking terms before making an appointment with you.
The Appointment Scheduler 2.1. supports both email and SMS notifications. You can customise the notifications under the Confirmation tab in the Bookings page (Options>Bookings>Confirmation). You can use the tokens listed in the information box to personalize your emails.
N.B. Please note that if you'd like your system to send reminders to clients, you need to use the Reminder tab.
To install the appointment script you need to upload the files onto your script. Then an install wizard should start and guide you through the installation process. You can check the Video page to see a video on how to install the appointment script.
Once the appointment script is installed on your server, use the Install page in the Admin to embed the appointment scheduler on your web page. You simply need to copy/paste a simple snippet of code. You can check the Video page to see a video on how to integrate the appointment script...
As you have already installed the script package on your new webhost server - all you need to do to move the MYSQL database data and all the script settings from your previous installation is:
1) export the whole database from your old location and import it in the new MySQL database. This can easily be done using phpMyAdmin
2) copy all files from the following folders to the new installation:
/app/web/upload folder
/app/web/invoices
/app/web/backup
You can export bookings by following these steps:
1) From the Admin, go to Bookings.
2) Change the number of the visible entries on the page so you will be able to fit all new bookings on a single page. You can do that by using the Items per page option at the bottom right of the screen.
3) Mark all entries or individual entries.
4) Use the Choose action button at the bottom of the page to Export selected bookings.
Do you have more questions?
Contact UsUseful Resources
More FAQs