- Colection of 65 PHP scripts for $4.29 each
Knowledge Base
Review the most common questions about our Restaurant Booking System and learn how to use the script easy and efficiently.
Restaurant Booking System
The knowledgebase below is for the previous version for the Restaurant Booking script. We've recently launched a new version based on our latest framework and are currently working on a new knowledge base for it. Read more in our blog here.
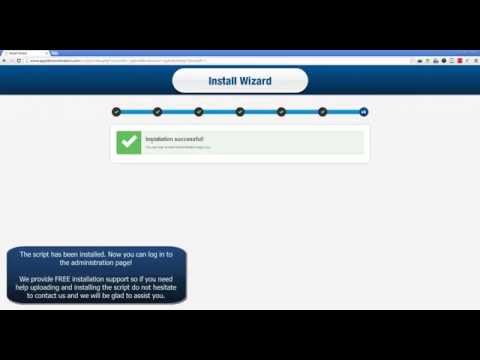
The restaurant booking system has an installation wizard which will guide you through the installation process. The only thing you need to is to upload the script files onto your server, then the installation wizard will start.
Have issues installing the restaurant booking system? See the frequently asked questions here or contact the tech support team.
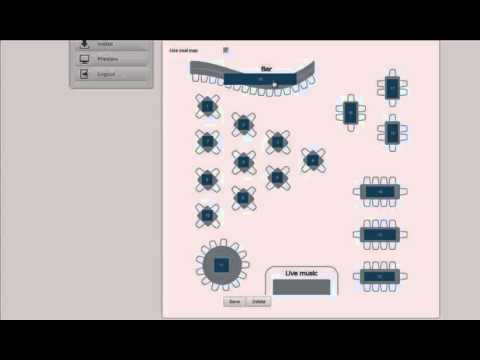
With the restaurant booking system you are able to create an interactive seat map of your restaurant and your customers can visually book the desired table and seats.
To create an interactive seat map, you need to:
1. Upload an image of your restaurant floor map in JPG format. Go to Restaurants>Seat Map. Select the checkbox next to Use seat map and upload the image. Note that the restaurant booking system supports JPG files only.
2. Create clickable hotspots over your tables. Click once on a table to mark the table as clickable. Click on the created hotspot to edit the capacity.
See a video on how to create interactive seat map.
With this restaurant table booking system you can set automatic booking reminders via email or SMS to remind your clients for the upcoming reservation.
To set booking reminders go to Options>Reminder. After the option Enable notifications select 'Yes'. You can set the number of hours before the reminder is sent and customise the text of your message.
N.B. To activate SMS reminders, you need to have an API key. See SMS plans.
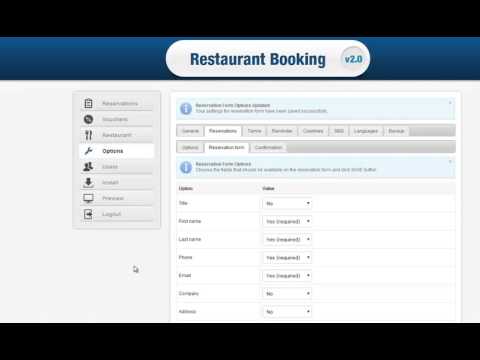
With thi restaurant table reservation system you can easily customise the booking form on the front-end. You can choose which fields to be available or mandatory or which field to hide in the booking form. Customise your booking form by going to Options>Reservations>Reservation Form. Use the drop downs to choose which field to be available on the front-end, mandatory or hidden.
With this restaurant reservation software you can set both email confirmation upon new bookings and reminders to clients.
Email confirmation are triggered by different events such as new booking made, new payment received, booking cancelled, etc. and can be sent to both client and admin to confirm such an event. The email confirmation messages usually includes booking data and personal information. You can use the available tokens in the admin to include that information in the auto-responder.
Booking reminders are sent to customers via email or SMS usually to remind them for the upcoming booking.
You can customise the email confirmation message under the Options>Reservations>Confirmation. You can customise both the client and the admin confirmation. Use the available tokens to personalise your messages.
To customise the booking reminders, go to Options>Reminder. You can set email and SMS reminders. Use the available tokens to personalise your messages.
N.B. To activate SMS reminders, you need to have an API key. See SMS plans.
Create an unlimited number of users with admin or editor level of access. Admins have full access to the restaurant management features, vauchers, reservation, etc. Editors have permission to see the booking schedule and edit/add bookings. Editors do not have access to the system settings and options and they can be any staff member in your restaurant , such as hosts and restaurant manager.
If you do not want to charge a deposit for confirming the reservations you need to disable payments from the Options>Reservations. You need to select 'Yes' for the option asking you if you want to disable payments and only collect reservation details.
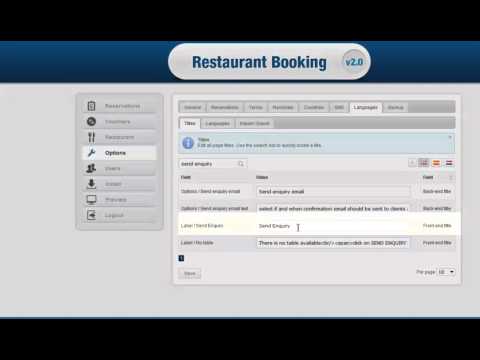
Translate your restaurant reservation system and add multi-language support on the front-end. You can easily do that by using the Language module in the Admin.
Adding a multi-language switch bar on the front-end:
1. You need to add the languages that will be available on the front-end. Do that by going to Options>Languages, then click the Add language button, choose a language from the drop down.
2. You need to translate the script system messages. You can do that manually (Titles) or import a language file to the system (Import/Export). See a video in Video Tutorials on how to translate the script to a different language.
See also a video how to translate the restaurant reservation software using the Admin...
3. To embed the table reservation system with the multi-language switch bar, go to Install page. Leave both language options there untouched then, copy the code and paste it into your web page.
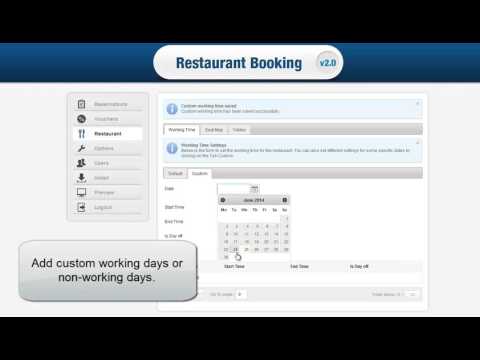
To set opening hours for your restaurant (hours when bookings are allowed) go to Restaurant>Working Time. From there you can set the working hours for each day of the week when your restaurant is open for visiting.
Once installed on your server, all you need to do to embed the restaurant reservation system on your website is to copy/paste a short snippet of code into your page. In the Admin go to Install, then copy the code and paste it into your web page.
To add a custom booking terms to your restaurant reservation system go to Options>Terms. Then enter your booking terms in the fields. You need to that for each language of the available languages in your system. Click Save at the bottom of the page.
With this restaurant table booking system you have several possible options to accept payments for bookings.
1) Paypal
2) Authorize.NET
3) Payments with credit cards
4) Wire transfers in your bank account
5) Payment in cash
You can enable any of them on the front-end and let you clients choose how they would like to pay for confirming the table reservation. Do that by going to the following page Options>Reservations, then select 'Yes' for each of the payment methods you'd like to enable on the front-end and set details where it needs.
If you'd like to disable payments see the above question "I don't want to charge a deposit (any) fee for reservation? How can I turn it off?"
If you do not use a table map, you can still set up tables and capacity under the following page Restaurant>Tables. Make sure you have unchecked the options for using a graphic map under the Set Map page. Then you can add tables and capacity manually.
It’s important to regularly backup your database to prevent any loss of information. You can easily backup files and database and export the backup from the Options>Backup. Once you create a backup you can download your files and database to your computer.
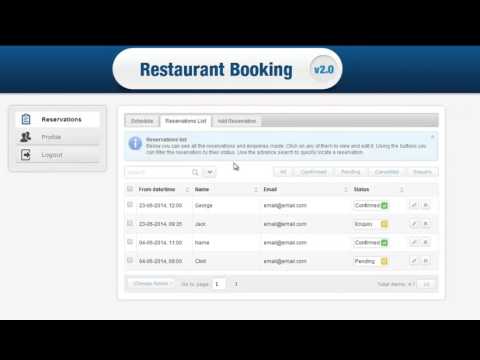
Yes, you can export all or specific reservations. Go to Reservations>Reservations list.
- You can use the Search/Filter to narrow the reservations and export a list with reservation by certain criteria.
- You can also select reservations by checking the check-box on every line.
- Or, click on the check box in the upper left box to mark all the entries.
Click on Choose Action button at the bottom of the page select Export.
Do you have more questions?
Contact UsUseful Resources
More FAQs